
Behind the scenes of the Wall Vase, 3
- Apr 26, 2023
- 3 min read
Updated: May 24, 2023
“How does that work?”
“How is that staying on there?”
“That’s so clever!”
“What a neat idea!”
These are all common responses I hear when I’m sharing my Wall Vases at market events. And it’s all thanks to the magnets I’ve designed into the construction of this foundation piece.
One of the requirements I had when designing this piece was that it had to be cute and unique. This is where I decided to create a way to add the interchangeable Buttons I make. But done in a way that wouldn’t take away from the beauty and character of the reclaimed wood I was using.
I just love it when form and function blend in a way that is aesthetically pleasing and this Wall Vase nails it, if I do say so myself. So let’s get to adding the hidden, magical magnets.


When adding the magnets, most of the time is spent working from the backside of the Wall Vase. This is to ensure the magnets stay hidden in order to give flexibility when switching Buttons. Ultimately it keeps the aesthetics of the end result just as much a priority as the function this hardware provides.
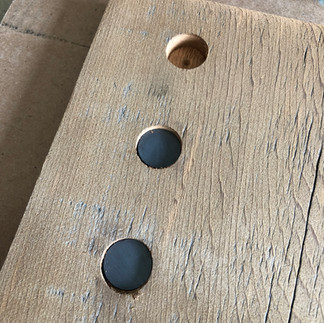
There are three vital steps in the phase of adding magnets: measuring exactly where the magnets will be hidden, drilling appropriate depth holes and ensuring the magnets are facing the correct way. These steps can be a little confusing especially when working backwards

By accurately measuring where the magnets go provides consistently aligned placement of the Buttons, especially when two and three Buttons are used at the same time. I found the best way to measure accurately is by using my sewing ruler. I absolutely love this tool and how it provides a clear, easy to read ruler on two sides while allowing me to see the wood underneath it. I get consistent results each time.

Drilling appropriate depth holes is a goldilocks situation. The holes have to be deep enough to allow the magnets to have a strong connection through the wood. While at the same time not being too deep to where I drill a hole straight through the front. This took a bit of trial and error when making my prototypes and now I’m happy to say I’ve got a solid system.
Once the holes are drilled to the just-right-depth, it’s time to add the magnets. The focus here is to make sure I put the magnets in correctly so the polarization does not repel each other when Buttons are added to the front. This isn’t a difficult task, but it is easy to skip in the excitement of wanting to get the project completed.
If I put the magnets in the wrong way it will cause me a lot more time and effort to fix. And, by learning from experience, it’s best for me to add this as a vital step to save a lot of frustration in the future.
One of my main focuses for this brand is to create as sustainably as possible. One tiny way I do this is by not using chemicals, like adhesives. For the Wall Vases that means the magnets are not glued in, but rather wedged in by filling the void with paper. This might take me a bit more time but it keeps the magnet stable and secure while staying true to my sustainable ways.

Once the magnets are securely nestled in their home I attach the back piece to give a clean and tidy look. Sometimes adding this back piece may take a few attempts to get right. Because of the age of the wood plus the way the grain is running and the way I'm drilling into it, sometimes it will split on me, especially if I get too close to the edge. So this takes some patience and finesse.

The magnets are now officially fully hidden, allowing for a functionally beautiful piece to provide a foundation for plants, flowers and Buttons.
Next time in this short series, we will close out the making of the Wall Vase by adding a few last details, which if I do say so, is one of my strengths.


Comments